What is a Slime-mould?
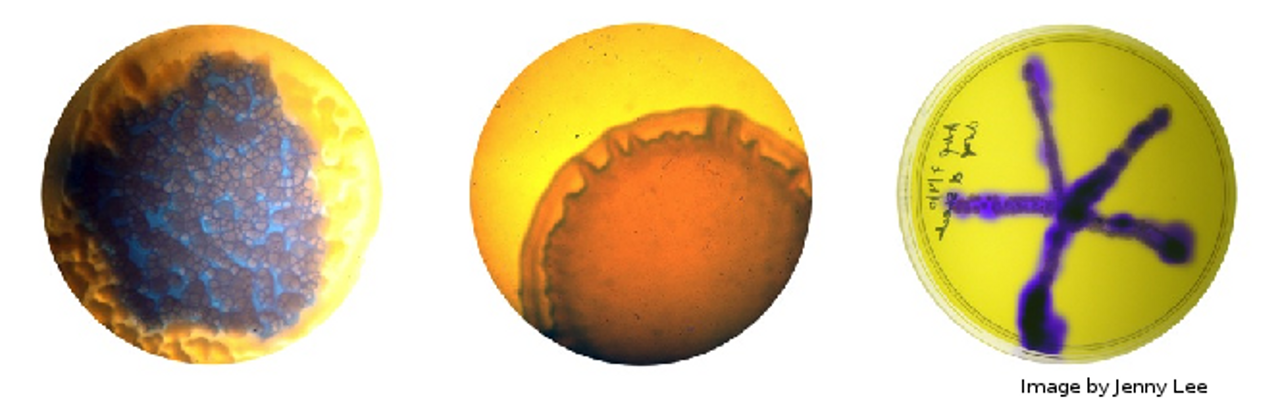
A slime mould is firstly, not actually a mould, but a collection of protists (single-celled organisms) living together. There are over 900 species of slime mould worldwide, and the name in fact refers to a particular stage in their life cycle, spent as a large, gelatinous bag of cell slime. Heather Barnett gives a fantastic summary of a particular slime mould, Physarum Polycephalum which I will be experimenting and playing with. Physarum is one of the most common slime moulds, feeding on starchy wastes such as dead, moist wood in the wild, or more commonly, on oats and oat-agar in labs (and art spaces!).
The reason for such interest in slime moulds is due to their apparent basic, simplistic intelligence and search behaviours (again, Heather gives a wonderful summary in her talk). The ability to explore mazes, and then reduce down all possible routes to the most efficient presents use as a biological computer, while the intricate, dendritic patterns the mould forms has great appeal to artists and scientists alike. As the mould is a living creature, it can also easily absorb dyes or pigments from its food sources (something which I am keen to try out) but it has its quirks as well. For example, the mould is not keen on cool, dry environments, nor is it particularly attracted towards light, which can make imaging the mould a little fiddly. The easiest work around is to use time lapse photography, only briefly exposing the mould to a flash of light – but this can be expensive…
The Project
As I wish to play around and image the mould, the first stage of my project is to build my own time-lapse camera. I’ve done something similar before, but the webcams are too low resolution for my purposes. So, thanks to a donation of an old digital camera and the purchase of a second, I am working on hacking the 5 and 14 megapixel CCD sensors to operate under the control of my Raspberry Pi, which will then take over the work of time-lapsing. At the same time, I have taken delivery of the slime mould, so I need to get it’s home built and should probably throw it an oat or two. In the meantime, I’m taking suggestions for names of the mould…
Mo’ Cameras, Mo’ Problems
So, one of the issues of working with Physarum is that isn’t the fastest moving thing in the world. At best, it will move at around 1cm/hour. So filming my collaborators is out of the question, unless I want to overstuff my hard drive in less time than it takes you to read this post. The other issue is that Physarum prefers to hang out in the dark with all the cool mould kids, so I can’t leave it in a well lit area – another major problem for imaging its movement then. Modifying the old cameras is supposed to work around these issues, but progress has been slow. Firstly, there is no documentation available of the circuit diagrams for each camera, so it will take more than a week to reverse engineer them. Secondly, neither of the two cameras supports webcam functionality directly, which means I can’t use their onboard drivers anyway to run the timelapse. The solution I’ve found to this is to use a third camera (my proper, precious camera!) and utilise the A/V out ports that it has along with a USB video capture card. Simple right?
Well, no, as I don’t have the correctly sized power adapter to allow me to run the camera from the mains (battery powered timelapses don’t bode well) and the connector type is a slightly odd, non-standard power jack. Googling around returns just the manufacturer official supplies and the like, but nothing telling me exactly what form of jack it needs to be. To Maplins then!…
Thankfully, after a little pottering about in Maplins, I managed to get the only matching power jack they had, and have soldered it onto the end of an old 5V supply (the one I initially thought was for the camera). The next step is hooking it all up to the laptop and trying it out – I need to make sure it’s easy enough to get running with Windows before I use the Pi, so that I can troubleshoot the issues down the line. Plug it in and… oh, why must drivers be such a pain to install? Still, I’ve located them on the disk, seperate to the autoplay, so I can always rip them onto a USB if need be.
Drivers installed, we plug in the camera, and my viewer shows its recognised. However, one of the two available resolutions isn’t working, and the other is only black and white… After disconnecting the camera, and rooting around the menu, I realize I probably ought to set the video encoding to NTSC rather than PAL, as only Europe uses that for TV, whereas every PC thinks it’s American. Anywho, we have colour! I still can’t make use of the second video format, but who cares? I just want to trigger image capture with flash. The next step will be hooking everything up to the Pi, before the slime moulds escape and working out whether or not the I can remotely operate the camera with some software for a *nix box. I suppose it depends whether the A/V is purely A/V out or can take commands as well. If not, a simple LED circuit should suffice, provided I build in the timed operation of it into my eventual shell script for timelapsing!
Problematically, the video grabber doesn’t want to work with the Pi. Time to get some help. After a quick hop over the Hackspace, I return with some help and expertise in *nix, to see if we can locate working drivers… After an hour and a half, it’s not looking good, and it would appear as old as the video grabber is, it isn’t supported on *nix. Great. Back to square one. In the meantime, I’ll solder together a lighting rig of LEDs to illuminate the box, and then route all of them through a transistor that I will switch on from the Pi’s GPIO port. Then over to Maplins to give them yet more of my money to find a camera that will work with the Rpi and provide a sufficient resolution. It may be easier next time to just pay for the 5MP camera unit that is meant to attach to the Pi next time, but that wasn’t necessarily the point of the exercise (plans will continue to be worked on to reverse engineer those old cameras!).
Good old Logitech. Their handy HD webcam works very well with the Pi, and while I still can’t operate it derectly, and only do video frame grabs, it does at least integrate well with fswebcam and allows me to use the onboard auto-adjustment features when doing so. This means I can easily control the camera and all of its images with small and elegant shell script. Meanwhile, I’ve left one of the slime moulds bathing in red food dye mixed with a small amount of porridge-water, in the hope that it will absorb the colouring. Currently, it looks like the mould is rather unimpressed at being submerged though.
Putting it all together
Okay, here goes. The maze has been constructed, the bash script written and the multiple LED mini-boards put together and inserted. The moulds have been placed at their respective ends of the maze (the one I tried to dye hasn’t taken up any colour sadly, but has migrated to the edge of its dish, and seems to be hanging out quite happily there). The camera is in place over top, and the Pi is set to run the whole thing. I will officially start timelapsing (with only one day to go!) at the stroke of midnight. The lighting should just about work, and I’ve added some extra holes in the side for a lamp to be on to give a low background light inside the box, and to improve the image quality. The shell script utilises the fswebcam functions to skip the first few frames while an image stabilises then merges together 50 frames (a single second of video) into a clearer composite. The transistor that runs the lighting circuit is a little warm to the touch (I blew out one earlier when first putting everything together, needless to say, soldering together a circuit you’ve made up on the fly while rather tired does not make for a happy mix) but it is rated for up to 50V and I’m putting through 16V maximum, spread over 24 LEDs. The last thing I’ll do is quickly reboot the Pi to make sure the memory is purged and it all runs optimally.
R.I.Pi
The Pi died. I’m writing this the morning after, having spent until 1am trying to resuscitate the poor thing, but the Pi has died. It was three and half years old. And has now given up on life. Annoyingly, I don’t have a spare, and the fault isn’t a flash card problem (the most common failure for RPis) but appears to be part of the circuitry somewhere. Weirdly, none of the board was hot, so it can’t even be an overload. The Pi is just dead. Cause unknown. This has rather put the kibosh on timelapsing, as even if I can get a replacement Pi now, there won’t be enough time to see any significant change from the mould, which, incidentally, is not keen on moving. The one in the dye seems to be happy to hang out by the pool, while the other has only moved slightly out of its dish. I didn’t bother leaving the external light on last night as the Pi wasn’t going to be doing anything, which would explain why one mould has barely moved. I think the dye water has sufficient nutrients within it to explain why the other is still in its dish – why head elsewhere when you have delicious starchy sugar water right here?
It looks like the whole experiment at this point has failed. On the upside, most of the hard graft is done, so repeating the process and improving it should be far more feasible.


