
A group of 10 artists, scientists and makers got together for a bioLeeds sandpit afternoon to come up with new ideas for collaboration. We organised and facilitated the activity ourselves collectively.
A group of 10 artists, scientists and makers got together for a bioLeeds sandpit afternoon to come up with new ideas for collaboration. We organised and facilitated the activity ourselves collectively.


Craft Industrialism seeks to set up a new initiative that bridges the gap between the maker and the public.
A carefully curated public space will be created to reveal the process of craftsmanship and showcase the maker’s creative process. Each selected maker’s work will be carefully presented in an informal setting to enable the narrative of the work to be revealed, and to demonstrate the complexity and consideration that goes into every craft product made – from the initial starting point, design development and to the final production method.
Low-tech, interactive ‘factories’ will be featured in the space, to enable public participation in the making process. Resulting in social engagement and knowledge transfer between the maker and the public. Through this project we hope to achieve wider understanding and appreciation of craftsmanship and to promote and support our local creative communities.
Read more and apply here
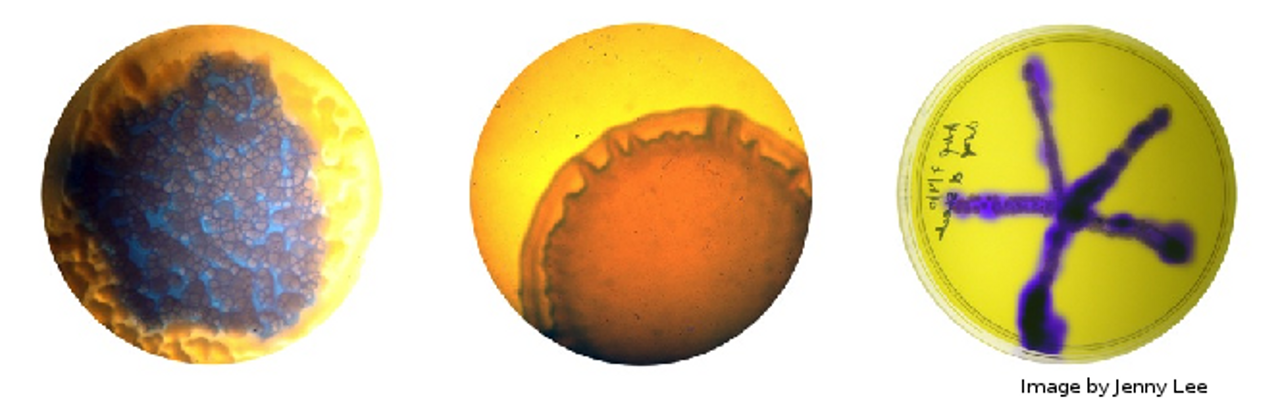
A slime mould is firstly, not actually a mould, but a collection of protists (single-celled organisms) living together. There are over 900 species of slime mould worldwide, and the name in fact refers to a particular stage in their life cycle, spent as a large, gelatinous bag of cell slime. Heather Barnett gives a fantastic summary of a particular slime mould, Physarum Polycephalum which I will be experimenting and playing with. Physarum is one of the most common slime moulds, feeding on starchy wastes such as dead, moist wood in the wild, or more commonly, on oats and oat-agar in labs (and art spaces!).
The reason for such interest in slime moulds is due to their apparent basic, simplistic intelligence and search behaviours (again, Heather gives a wonderful summary in her talk). The ability to explore mazes, and then reduce down all possible routes to the most efficient presents use as a biological computer, while the intricate, dendritic patterns the mould forms has great appeal to artists and scientists alike. As the mould is a living creature, it can also easily absorb dyes or pigments from its food sources (something which I am keen to try out) but it has its quirks as well. For example, the mould is not keen on cool, dry environments, nor is it particularly attracted towards light, which can make imaging the mould a little fiddly. The easiest work around is to use time lapse photography, only briefly exposing the mould to a flash of light – but this can be expensive…
As I wish to play around and image the mould, the first stage of my project is to build my own time-lapse camera. I’ve done something similar before, but the webcams are too low resolution for my purposes. So, thanks to a donation of an old digital camera and the purchase of a second, I am working on hacking the 5 and 14 megapixel CCD sensors to operate under the control of my Raspberry Pi, which will then take over the work of time-lapsing. At the same time, I have taken delivery of the slime mould, so I need to get it’s home built and should probably throw it an oat or two. In the meantime, I’m taking suggestions for names of the mould…
So, one of the issues of working with Physarum is that isn’t the fastest moving thing in the world. At best, it will move at around 1cm/hour. So filming my collaborators is out of the question, unless I want to overstuff my hard drive in less time than it takes you to read this post. The other issue is that Physarum prefers to hang out in the dark with all the cool mould kids, so I can’t leave it in a well lit area – another major problem for imaging its movement then. Modifying the old cameras is supposed to work around these issues, but progress has been slow. Firstly, there is no documentation available of the circuit diagrams for each camera, so it will take more than a week to reverse engineer them. Secondly, neither of the two cameras supports webcam functionality directly, which means I can’t use their onboard drivers anyway to run the timelapse. The solution I’ve found to this is to use a third camera (my proper, precious camera!) and utilise the A/V out ports that it has along with a USB video capture card. Simple right?
Well, no, as I don’t have the correctly sized power adapter to allow me to run the camera from the mains (battery powered timelapses don’t bode well) and the connector type is a slightly odd, non-standard power jack. Googling around returns just the manufacturer official supplies and the like, but nothing telling me exactly what form of jack it needs to be. To Maplins then!…
Thankfully, after a little pottering about in Maplins, I managed to get the only matching power jack they had, and have soldered it onto the end of an old 5V supply (the one I initially thought was for the camera). The next step is hooking it all up to the laptop and trying it out – I need to make sure it’s easy enough to get running with Windows before I use the Pi, so that I can troubleshoot the issues down the line. Plug it in and… oh, why must drivers be such a pain to install? Still, I’ve located them on the disk, seperate to the autoplay, so I can always rip them onto a USB if need be.
Drivers installed, we plug in the camera, and my viewer shows its recognised. However, one of the two available resolutions isn’t working, and the other is only black and white… After disconnecting the camera, and rooting around the menu, I realize I probably ought to set the video encoding to NTSC rather than PAL, as only Europe uses that for TV, whereas every PC thinks it’s American. Anywho, we have colour! I still can’t make use of the second video format, but who cares? I just want to trigger image capture with flash. The next step will be hooking everything up to the Pi, before the slime moulds escape and working out whether or not the I can remotely operate the camera with some software for a *nix box. I suppose it depends whether the A/V is purely A/V out or can take commands as well. If not, a simple LED circuit should suffice, provided I build in the timed operation of it into my eventual shell script for timelapsing!
Problematically, the video grabber doesn’t want to work with the Pi. Time to get some help. After a quick hop over the Hackspace, I return with some help and expertise in *nix, to see if we can locate working drivers… After an hour and a half, it’s not looking good, and it would appear as old as the video grabber is, it isn’t supported on *nix. Great. Back to square one. In the meantime, I’ll solder together a lighting rig of LEDs to illuminate the box, and then route all of them through a transistor that I will switch on from the Pi’s GPIO port. Then over to Maplins to give them yet more of my money to find a camera that will work with the Rpi and provide a sufficient resolution. It may be easier next time to just pay for the 5MP camera unit that is meant to attach to the Pi next time, but that wasn’t necessarily the point of the exercise (plans will continue to be worked on to reverse engineer those old cameras!).
Good old Logitech. Their handy HD webcam works very well with the Pi, and while I still can’t operate it derectly, and only do video frame grabs, it does at least integrate well with fswebcam and allows me to use the onboard auto-adjustment features when doing so. This means I can easily control the camera and all of its images with small and elegant shell script. Meanwhile, I’ve left one of the slime moulds bathing in red food dye mixed with a small amount of porridge-water, in the hope that it will absorb the colouring. Currently, it looks like the mould is rather unimpressed at being submerged though.
Okay, here goes. The maze has been constructed, the bash script written and the multiple LED mini-boards put together and inserted. The moulds have been placed at their respective ends of the maze (the one I tried to dye hasn’t taken up any colour sadly, but has migrated to the edge of its dish, and seems to be hanging out quite happily there). The camera is in place over top, and the Pi is set to run the whole thing. I will officially start timelapsing (with only one day to go!) at the stroke of midnight. The lighting should just about work, and I’ve added some extra holes in the side for a lamp to be on to give a low background light inside the box, and to improve the image quality. The shell script utilises the fswebcam functions to skip the first few frames while an image stabilises then merges together 50 frames (a single second of video) into a clearer composite. The transistor that runs the lighting circuit is a little warm to the touch (I blew out one earlier when first putting everything together, needless to say, soldering together a circuit you’ve made up on the fly while rather tired does not make for a happy mix) but it is rated for up to 50V and I’m putting through 16V maximum, spread over 24 LEDs. The last thing I’ll do is quickly reboot the Pi to make sure the memory is purged and it all runs optimally.
The Pi died. I’m writing this the morning after, having spent until 1am trying to resuscitate the poor thing, but the Pi has died. It was three and half years old. And has now given up on life. Annoyingly, I don’t have a spare, and the fault isn’t a flash card problem (the most common failure for RPis) but appears to be part of the circuitry somewhere. Weirdly, none of the board was hot, so it can’t even be an overload. The Pi is just dead. Cause unknown. This has rather put the kibosh on timelapsing, as even if I can get a replacement Pi now, there won’t be enough time to see any significant change from the mould, which, incidentally, is not keen on moving. The one in the dye seems to be happy to hang out by the pool, while the other has only moved slightly out of its dish. I didn’t bother leaving the external light on last night as the Pi wasn’t going to be doing anything, which would explain why one mould has barely moved. I think the dye water has sufficient nutrients within it to explain why the other is still in its dish – why head elsewhere when you have delicious starchy sugar water right here?
It looks like the whole experiment at this point has failed. On the upside, most of the hard graft is done, so repeating the process and improving it should be far more feasible.
Our challenge was to brew a beer in the 9 days of ASMbly lab 2014 ready for the final exhibition. ASMbly lab is an annual pop-up workshop space in central space for artists, scientists and makers to collaborate. Homebrewing a good quality bottle-conditioned beer can often take 6 weeks to 3 months from grain to glass, so we needed to examine the science of the processs to see how we might speed things up and still end up with a pleasing product! Below is a daily blog during the event detailing our progress and the science behind the recipe and processes we used.
(Daily blog posts are in reverse date order, so scroll to the bottom of the page to read in chronological order…)
10th September
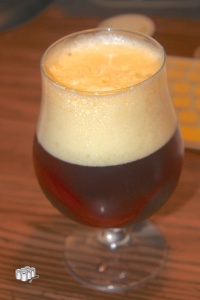
So last night was the final exhibition and we tasted the beer. The general consensus was that our efforts were a success. The beer was pale with a strong white foam head, it had a pronounced hop bitterness and floral aroma with a mild but not prominent fruitiness from the yeast. The beer didn’t have a strong depth of malt character, but this is to be expected for a low gravity pale ale and is common for summer ales. The one slight disappointment was that the beer was still a little cloudy despite our best efforts to produce a clear, transparent final beverage. However this did not prevent anyone from enjoying their beer and the Superposition Pale Ale tasting sheet explaining the science behind the visual, flavour and aroma chacteristics of the beer was very popular.

Superposition Pale Ale ready for tasting!

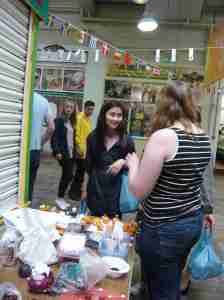
Visitors to the ASMbly lab exhibition scrutinising our beer with the tasting notes.

Exhibition visitors perusing the project exhibits on show at ASMbly lab.


9th September
Superposition Pale Ale is kegged and pressurised under CO2, ready to go this evening. The final ASMbly 2014 exhibition is tonight, 6-8pm at Live Art Bistro/East St. Arts, 1-2 Regent St., Leeds. All are welcome to come down and see all the collaborative art-science-maker projects that have been taking place and to taste our speed brewing project that we have done on a nano brewery scale: 19 L of Superposition Pale Ale. There will be a tasting sheet to help you appreciate the characteristics of the beer with details behind the science of your sensory experience of the beverage.
But first we need to explore our final beer science post. While there are many aspects we haven’t covered in this 10 day blog, such as the malting and mashing of the barley and the effect of the chemical composition of the water that’s used. There is just not time to cover everything. We have discussed some of the off-flavours in beer as well as some of the flavour characteristics of yeast strains, but now let’s look at what, in my opinion, really makes beer taste great….
Beer Science: setting your taste buds hopping!
In an earlier post on why beer is bitter I promised more details on how hops add a wide range of other flavours to your beer. Bitterness came from the isomerisation of alpha acids during the boil, but there are several other compounds that hops add to the beer that are important for the overall flavour and aroma.
Essential oils in the hops provide a lot of the flavour and aroma. These oils can add notes to the beer that are floral, fruity, spicy, piney, citrus, herbal, grassy, cheesy, woodsy, garlicy, etc. and each hop variety has a different balance of essential oils meaning that they add a very different character to the beer. This is why I used the earlier analogy for hops being equivalent to curry spices.
There are 3 classes of essential oils: hydrocarbons (up to 75% of oil content), oxygen-bearing compounds (~25% of oil content) and sulphur containing compounds (low content). Two of the major hydrocarbon oils in hops are humulene and myrcene, which add what have been described as elegant (woody/piney) and pungent (resinous) notes, respectively. The oxygen bearing compounds play a major role in defining the hop’s basic flavour. Linalool has a pleasing floral, orange hoppy aroma, while geraniol adds floral/sweet/rose notes to the beer. Sulphur-containing compounds however are undesirable flavour characteristics to a beer (recall our post on brown bottles and beer skunking!) and so efforts are taken to use hops with low sulphurous oil content.

Some of the most abundant essential oils in hops
Essential oils can be driven off the beer during a long boil due to evaporation. Therefore bittering hops (boiled for 60 min.) tend not to add very significantly to the flavour and aroma of the beer beyond adding the bitterness. Flavour hops tend to be added during the final 20 min. and aroma hops in the last 5 min. of the boil in order to retain as much of their essential oils as possible. We’ve made a fairly heavily hopped beer using Target, Challenger and WGV hops, partly to help disguise any slight off-flavours from the yeast metabolism still present due to the lack of a rest period for our speed brew (and partly because we love hoppy ales!).
Spicy, herbal, earthy and fruity are all words used to describe the flavour and aroma notes for our chosen hops. Tonight we get to see how the final product tastes!
8th September
Last night we checked the gravity (density) of our fermenting beer. This tells us how much sugar is remaining for the yeast to work on. It was down to about 1.014/1.015, while the predicted final gravity for our recipe is 1.012 (from a starting gravity of 1.041 – measured to be about 1.041/1.042 before we pitched the yeast). It appears that fermentation is not quite complete, but due to time constraints (we need this to be drank on Tuesday evening!), we went ahead with cold crahing the beer anyway (see yesterday’s blog entry) by placing the fermentation bucket inside a tub of iced water inside a refridgerator. This now means that we can readjust the final estimate of our beer’s abv to somewhere in the range 3.5-3.7% (there will be a little further fermentation as the beer cooled and when it is warmed back up to room temperature in the keg, but this will not be too significant). How will not letting our beer fully ferment to completion affect its final flavour, appearance and aroma? We’ll find out tomorrow night!
When checking the final gravity of our beer we had a smell of the aroma of our beer. While it smelled very “beery”, which is of course promising, there were definitely banana and other fruity notes detectable in the aroma. Remember from Saturday’s posts that banana ester (isoamyl acetate) is one of the by-products of our yeast’s fermentation. Will these be flavours be significant in our final beverage? We’ll have to wait and see. However, not having time for a rest period on the yeast, so that it can clean up a bit after itself by mellowing out the fruity esters and reducing the buttery diacetyl content in the beer.
Beer Science: Let’s give it some gas!
After cold crashing the beer overnight to (hopefully!) improve its clarity, today we need to transfer the beer into the keg and force carbonate it ready for dispensing to exhibition visitors tomorrow night. So what’s the science behind this step in our process?
Firstly, why is carbonated beer more pleasant to drink than flat beer? Carbonation affects the appearance, taste and odour of your beer. Firstly, the taste is effected due to the CO2 stimulating the trigeminal nerve, which senses hot, cold and spicy (e.g. capsaicin) sensations in the mouth. Secondly, the gas bubbles generated in the beer help release its odour so that you can move easily smell your beverage (and smell is a very important part of the overall taste!). Finally the white foamy head that forms on the top of the beer gives it a great visual appeal, where this head itself can also give a different taste sensation compared with the liquid beer that lies beneath.
So carbonating our beer is important to enhance the experience of drinking it. I usually carbonate my home brew beer in bottles by adding a little additional sugar prior to bottling. This sugar is then converted to carbon dioxide (CO2) (and a little more alcohol) in the bottle, which naturally carbonates the beer. However this natural carbonation takes about 2 weeks – we don’t have time for that! Instead we will force carbonate the beer in a king keg. This means we will transfer the beer to the keg and apply pressure to it using a CO2 cylinder.
What is the physics behind this? To understand beer carbonation we need to know a little bit about partial pressures and Henry’s Law. The partial pressure of a gas mixture considers the pressure of each molecular species in the gas independently. For example, if we consider air (a mixture of 78% nitrogen, 21% oxygen and 1% other gases) at a pressure of 1 atm, the partial pressure of nitrogen is 0.78 atm, the partial pressure of oxygen is 0.21 atm, and the partial pressures of other gases add up to a total of 0.01 atm. Therefore the partial pressure of CO2 in the air is very low (effectively zero for our purposes).
Henry’s Law states that the solubility of a gas in a liquid is directly proportional to the partial pressure of that gas above the liquid. This implies that CO2 has negligible solubility in beer when that beer is in the air at atmospheric pressure (1 atm). Henry’s law works well when the solute (CO2) is in low concentrations in the liquid, which should always be the case when we are carbonating our beer. Therefore we need to increase the partial pressure of CO2 above the beer so that, in equilibrium, we have dissolved CO2 of about 5 grams per litre. In practise it can be shown that this is achieved by a CO2 pressure in the head space of about 12 psi (or 0.8 atm) at 4 oC. We have chilled out beer for the cold crash, so this temperature will not be a problem. We don’t have a regulator for our keg’s mini CO2 cylinder, so this will involve a little guess work. However the king keg comes with a release valve that activates if over-pressurised, so this should hopefully prevent us from grossly over-carbonating the beer.
The cold temperature for focre carbonation that we mentioned above enhances the solubility of CO2 in water (beer) as can be seen in the graph below. One thing of note is that we stated in the above that the dissolved gas needs to equilibrate with the gas above it. Equilibrium can take time to reach and for the dissolution of CO2 into our beer, this would take several days – time we don’t have! We need to speed things up a little. We’ll do this by shaking the beer once it is pressurised. By creating turbulance in the beer we will increase its total surface area in contact with the gas and therefore enhance the dissolution rate.

The solubility of CO2 in water as a function of pressure and temperature. Note that 1 atm ~ 0.1 MPa. Taken from Carrol et al., J. Phys. Chem. Ref. Data 20 (6), 1201 (1991).
Once we have force carbonated our beer, we will let the keg come back to room temperature ready to be served at the final exhibition tomorrow tonight. That will be the moment of truth when we will discover how well our project has gone….!
7th September
Beer science: how can we further improve the clarity of our beer?
One of our first blog entries detailed how use of a seaweed, Irish Moss, during the boil phase helps the clarity of our final beer. This supplements the hot and cold breaks, where protein aggregates and drops out of solution due to the heat of the boil or the rapid cooling of this wort down to a temperature where we could pitch the yeast. But is there anything we can do at this late stage to further improve the clarity of our Superposition Pale Ale?
Well, yes we can. Today we will check the specific gravity of the wort (which will tell us how much sugar is remaining) to ensure the fermentation process is complete. If, as we suspect, it has, then we will cold crash our beer to remove further haze-inducing proteins and yeast. This involves chilling the beer to close to 0 oC (we will place the fermenter into a larger bucket of ice and water). This will stop any residual yeast activity and cause many yeast to either die or become dormant. We will also deliberately induce chill haze in our beer. This is where colloidal aggregates form in the beer, scattering the light and making the beer cloudy in appearance. However many of these larger particles can now sediment to the bottom of the fermenter and will be removed from the beer once we siphon the beer off into the keg tomorrow. The chill haze forms mainly due to aggregation between polyphenols (tannins) and larger molecular weight proteins via weak hydrogen bonding interactions that are not stable at higher temperatures where the increased thermal energy of the molecules allows them to easily break these bonds.
A further step at this stage could be to aid the clearance of the haze using additional finings additives, such as gelatin that induce further aggregation and faster sedimentation of the particles that form. However we have decided not to do this, in part due to wanting the beer to be suitable for vegetarians! We don’t need our beer to have excellent stability against chill haze as we will be serving it at room temperature. However we want our beer to have an attractive clear appearance at these ambient conditions.

The gravitational and hydrodynamic drag forces acting on a sedimenting particle in solution.
Let’s look at the physics of sedimentation in more detail so we can predict how large our chill haze particles will need to be to remove haze proteins and excess yeast from our beer. There are two competing forces acting on a sedimenting particle. Firstly the gravitational force (FG) acting to promote sedimentation of the particle. This is the difference between the weight of the particle and the particle’s buoyancy due to Archimedes’ principle. Secondly, as the particle sediments it experiences a viscous drag force (FD) opposing the direction of motion. The particle rapidly accelerates until it reaches a terminal velocity (Vsed) at which the particles sediments to the bottom of the container.

At equilibrium, where the particle has reached its terminal velocity (this happens relatively quickly), FG = FD, therefore:
![]()
How big do our aggregate particles need to be to sediment to the bottom of the fermentation bucket (say 0.5 m) in 12 hours or less? We can use the above equation, taking an average density for proteins to be ~1.35 g cm-3 and our final predicted beer density (the final gravity) of 1.012 g cm-3. This gives a particle radius of about 4.7 μm. This is fairly good considering that commercial brewers who filter their products often use filters in the pore size range of 1-3 μm. Therefore these calculations suggest the cold crashing technique should be fairly successful.
I have never used the cold crashing technique on my brews before, but online homebrew forums tend to suggest that this process can have a noticeably beneficial effect on the appearance of their beers. So let’s give it a go!
Fingers crossed that our strategy is successful!
6th September
Beer science: yeast as chemical factories for flavour compounds
We have already considered the primary aerobic and anaerobic respiration reactions in yeast in our post on beer thermodynamics. The latter of these reactions is responsible for the conversion of sugars in our wort into alcohol. However the relatively straightforward chemical reactions we presented for these processes hide the true complexity of these reactions. There are multiple intermediate steps along these respiration pathways involving numerous enzymes and cofactors in the yeast. A detailed look at these processes reveals a series of anabolic and catabolic enzymatic reactions including oxidation and reduction steps. We won’t look at these pathways in excruciating detail, but the key point to understand is that chemical intermediates in these pathways offer opportunities for branching in the chemical pathway resulting in the production of other organic molecules (e.g. esters, ketones, organic acids and higher alcohols). These are usually very minor by-products compared to the main pathway to the production of ethanol, producing maybe as little as one part in 50,000 of another organic compared to ethanol, and are therefore fairly insignificant to the metabolic efficiency of the yeast. However these compounds have very low flavour thresholds and so are very important when considering how our beer will taste!

The structures of organic compounds. R groups represent varying organic (carbon-based) parts of the molecule.
The true fermentation pathway breaks down glucose to pyruvic acid, which in turn is converted to acetaldehyde, which is reduced to form ethanol (the standard alcohol for our beer). However the formation of pyruvic acid is the first branching point in this reaction pathway. Oxidation of pyruvic acid forms part of a process that generates acetyl coenzyme A, a sulphur containing compound that acts as a further branching point in the biosynthesis pathway forming fusel alcohols, fatty acids and esters. Once alcohols form, they can also combine with organic acids to form esters. Pyruvic acid can also be converted to diacetyl. The yeast can reduce the diacetyl once fermentation is completed in a process referred to by brewers as the diacetyl rest. We won’t have the luxury of time for a diacetyl rest period, so we are hoping that this will not be too pronounced a flavour in our beer. A table showing some of the major organic flavour compounds produced by yeast and the flavour notes they add to the beer is at the bottom of today’s blog entry.

It should be noted that production of these different flavour compounds are driven by enzymes in the yeast and the proportion of each compound that is produced is dependent on the strain of yeast being used. Our Whitbread Ale yeast has a mildly malty and slightly fruity fermentation profile. Many commercial brewers are very protective of their own proprietary yeast strain as it is this that gives a unique flavour character to their beers.
One danger within the brewing process is that the wort gets contaminated with unwanted natural yeasts and bacteria that are around us in the environment. These can be found in the air in regions surrounding a brewery at approximately five times the population density as elsewhere. Lactic acid bacteria can add a large amount of diacetyl and lactic acid to the beer even in relatively minor populations within the fermentor. Acetic acid bacteria covert ethanol to acetic acid (vinegar!) again souring the beer. Sulphur producing bacteria add suphur-containg compounds to the beer like dimethyl sulphide and hydrogen sulphide that make the beer taste like rotten vegetables. It is essential to take precautions to prevent contamination of your beer once the boil of the wort is complete. Brewers need to sterilize, sterilize, sterilize! We have been using VWP sterilizer for any equipment that touches the wort after the boil phase.
Fermentation at higher temperatures tends to increase the amount of esters and other flavours from these branching reactions off the main respiration pathways. Too high a concentration and the fruity notes that can be pleasant in beers in subtle amounts can start to become overpowering and even taste solvent-like. Hopefully we’ll end up with a nice balance of these flavours in our final beer.

Table of important flavour compounds that yeast metabolic processes can impart on the final beer product
5th September
Beer Science: Why are beer bottles brown?
Most beer is sold in brown bottles. This doesn’t allow the customer to see the visual appearance of the beer before they buy it. So why is this the norm? The answer is to protect the beer from the light, in particular direct sunlight and fluorescent lighting.

A Brown beer bottle.
Ultraviolent and blue wavelengths of light result in the photo-oxidation of compounds in the beer that give rise to off-flavours. In particular, isohumulone, which is one of the bittering agents from hops, undergoes photochemical cleavage in the presence of the photosensitiser riboflavin (vitamin B2) to produce 3-methyl-2-butene-1-thiol (MBT), which is a major constituent of the odorous spray from a skunk! Obviously skunky beer is highly undesirable. Therefore it is important to protect hopped products, i.e. beers, from the light as much as possible. Keep your beer out of direct sunlight and, if bottling your homebrew, use brown bottles.

MBT gives the beer a characteristic skunkiness!
Many large commercial brewers prefer to sell their beers in green or clear glass bottles. Clear bottles have a better visual appeal when marketing their products on the shelves of bars or supermarkets; but these offer little to no protection from skunky “light struck flavour”. Generally these brewers use special hop extracts that do not contain isohumulone in order to protect their beer from skunking. However there is some evidence that other photosensitive compounds in beer can generate off flavours and odours.
We will not be bottling our Superposition Pale Ale as we do not have time for the 10-14 day bottle conditioning time to take place. Instead we will be force carbonating our beer in a keg. However direct sunlight can generate quantities of MBT above the detectable threshold in beer within minutes; therefore we will be taking care to protect our beer from direct sunlight (not a common problem associated with the UK!) that could spoil our well-hopped bitter.
4th September
Beer Science: yeast populations and brewing thermodynamics
Release of CO2 from our beer fermentation, a product of yeast respiration.
Yeast are microorganisms from the Fungi kingdom and Brewers’ yeasts are of the species Saccharomyces cerevisiae. Brewer’s yeast strains are distant cousins of bread yeast but have been cultivated to have optimal fermentation and flavour properties for the production of great tasting beers. We will discuss some of the favourable and unfavourable flavours that yeast can add to the beer in a future blog entry.
 Yeast cells showing “birth scars” from the cell division process of reproduction.
The yeast strain we chose for our brew was Whitbread Ale yeast (Wyeast 1099). This yeast can function happily up to 24 oC and has high flocculation, so the yeast won’t remain in suspension after they have done their work, making the beer appear cloudy. We chose to pitch two packets of yeast for our speed brewing project to try to help things along quickly, giving us a starting population of approximately 7.5 Mcells/ml. Is this enough yeast?
The maximum yeast density for efficient fermentation is thought to be 100 Mcells/ml, so we are some way short of that. However the yeast population reproduces and doubles every two hours. We need about 4 generations of doubling to reach this optimum, so this would have taken approximately 8 hours. Brewers’ yeasts are facultative anaerobes (!) meaning they can undergo both aerobic and anaerobic respiration. For the yeast cells to have enough energy to grow and divide they must undergo aerobic respiration (note that aerobic respiration can cause off flavours in the beer and so we want the number of generations of population growth to be a minimum; 3-4 generations is often considered to be optimum). Therefore we made sure to oxygenate our wort before pitching the yeast by pouring the wort (and additional water to bring the final volume to 19 L) to the fermentation bucket from a height. This creates turbulence and foaming in the wort that enhances the dissolution of oxygen from the air.
Why is aerobic respiration required? Aerobic respiration generates more energy that the yeast cells can use to grow and reproduce. However this process uses sugars from the wort without generating alcohol.

Glucose and oxygen are converted to carbon dioxide and water and a lot of energy
Some of the energy generated by aerobic respiration will also be lost to heating the wort. (If all this energy was converted to heat, it would boil the wort and kill our yeast cells! Thankfully this is not the case…). This heat energy raises the temperature of the fermentation over the first day or so of fermentation. We wrapped our fermentation bucket in a duvet to keep as much of this heat energy in the wort to speed up the initial rate of fermentation. We are also putting a duvet on the bucket at night to prevent the fermenting beer from cooling too much with the drop in ambient temperature in the room, and hence slowing the rate of fermentation (we need our beer to ferment as quickly as possible if it is to be ready in time for the final exhibition!!).

Our fermentation bucket tucked up in its duvet for its first night in ASMbly lab!
Alcohol is only produced once the anaerobic respiration phase begins.

Glucose is converted to ethanol (alcohol) and carbon dioxide and a little bit of energy
Therefore anaerobic respiration, while producing alcohol, does not provide enough energy for yeast to reproduce and an optimum yeast population density is required for the fermentation to reach completion. Therefore the initial aerobic phase is essential for the production of good beer.
As the fermentation proceeds, nutrients (sugars) for the yeast population will decrease such that the initial yeast population can no longer be sustained. The yeast population will crash as most of the yeast die or become dormant. Our highly flocculant strain will drop out of solution and we will have a considerable layer of dead yeast at the bottom of our bucket to remove our beer from at the end of the fermentation process.
4th September
“Living as Form” and “Yeast Genetics”, today’s reading at ASMbly lab.

3rd September
Tonight will be the opening event of ASMbly 2014, where we will present our zymurgy project to visitors (6-8pm at Live Art Bistro, 1-2 Regent St., Leeds).
Beer Science: why does beer taste bitter?
The simple answer to this is because of the hops. Hops are the female flower of the plant Humulus Lupulus.They provide a significant proportion of the bitterness, flavour and aroma of your beer. There is a wide selection of hop varieties that a brewer can select for use in their beers that give the beer different flavour and aroma characteristics; they are perhaps analagous to the spices a chef might select to determine the spiciness, flavour and aroma of a curry. Hops can be used in different ways during a brew for bittering, flavouring and aroma. Here we will focus on the science of bittering hop additions and leave other aspects of hop flavours for a later date.
Hops contain alpha acids, beta acids and essential oils that give character to the beer. It is the alpha acids content that is most important for creating bitterness in beer. The alpha acid content of a hop variety is the primary information available to the brewer when buying hops from brewing suppliers. Good bittering hops tend to have a high alpha acid content (8-20%). Our bittering hops, target and challenger, have alpha acid contents of 12.01% and 9.25%, respectively. Alpha acids refer to three compounds within the hop: humulone, cohumulone and adhumulone. These compounds are not bitter in themselves and are poorly soluble in water. However these compounds become isomerised by the heat of the boiling wort. Isomerisation is a process where one molecule is transformed into a new molecule with exactly the same chemical composition, but having a different structure. These iso-alpha acids are much more soluble in water and give the beer its bitter taste. Bittering hops are added at the start of the wort boil such that most of the alpha acids in these hops are isomerised after 60 minutes of the boil.

Humulone isomerisation to cis– and trans– isohumulone.
Bitterness is measured in units of IBU (international bittering units). This is usually measured spectroscopically, but our beer has a predicted bittreness of 46 IBU. This is greater than the 25-35 IBU norm for ordinary English bitters and more in line with an Extra Strong Bitter (ESB; 30-50 IBU) or an India Pale Ale (IPA; 40-60 IBU), but with significantly lower alcohol content than these styles. Will our beer taste too bitter without the additional malt character of a higher gravity beer style to balance out this bitterness? Our decision to brew a heavily hopped ale was to disguise any off flavours from it being a young beer.
IPAs were originally brewed to be heavily hopped in order to aid preservation of the beer when shipped by boat to the British colonies in India. This is because the iso-alpha acids in hops are bacteriostatic agents. This means that they prevent the growth of bacteria. However they are not bacertiocidal, i.e. they do not kill the bacteria, so if the bacteriostatic agent is removed then the bacteria can grow again. The antibiotic nature of iso-alpha acids prevents the growth of unwanted bacteria in the beer that can create undesirable cloudiness and off-flavours. Iso-alpha acids only work against Gram-positive bacteria and have no effect on Gram-negative bacteria.
2nd September
Beer Science: how do you get a good head?
The head on a beer is a layer of foam that forms due to the release of bubbles of dissolved gas from the beer. Beer is carbonated with CO2 (or a mixture of N2 and CO2) under high pressure so that when the beer is opened and reaches atmospheric pressure, much of this dissolved gas is no longer soluble in the liquid and so bubbles of gas nucleate and rise to the top of the beer due to their buoyancy (the gas is less dense than the liquid). As the bubbles rise through the liquid they collect a layer of surface active molecules (surfactants) at their boundary. These surfactants lower the surface tension of the bubble and make them stable for a longer period of time – liquid foams are metastable structures and so have a finite lifetime before the bubble break and we just end up with separate liquid and gas phases. The surfactants in beer are predominatly proteins, so for a beer to have a good head it needs to have a good protein content. Some carbohydrates can also act to stabilize foam. The torrified wheat was used in the brew as it produces proteins in the mash that aid head retention. Maltodextrin is another additive that home brewers use for improving the lifetime of beer foams.
Note: If you think back to our post yesterday on using Irish Moss as a clarifying agent to prevent our beer being too cloudy, this beer additive removed proteins from our final beverage to reduce beer haze. The unwanted side effect of this is that Irish Moss can also remove some of the proteins that aid good head retention. Therefore Irish Moss needs to be used in moderation and we have something of a trade-off between beer clarity and getting a good head!
Why is beer foam white? Liquid beer is of course not white. It is usually golden, red, brown, or even black. Yet the beer bubbles that form the head on top of the liquid appear white. This effect is due to light scattering, and to be more specific, Mie scattering. The bubbles scatter light of all wavelengths randomly in all directions. Therefore light of all wavelengths is scattered back to the observer’s eyes, making the foam appear white. Foam is such a strong scatterer of light because the liquid films between the gas bubbles are of a similar thickness to the wavelengths of visible light.
How do I enhance the lifetime of my beer’s head? Use a clean glass and don’t drink the beer! Grease, dirt or residual detergents on beer glasses act to break up the foam. Similarly grease on your lips will also break the foam as you drink the beer. Also, as many a CAMRA member may be able to tell you, lipstick is particularly good at breaking up beer foam! Glasses with rough surfaces on the bottom enhance the foam on your beer as they act as nucleation sites for beer bubbles to form, enhancing the rate of head generation in your beer.
Tell me more about surfactants? Surfactants are amphiphilic molecules that have water-loving (hydrophilic) and water-hating (hydrophobic) parts of the molecule. Therefore these molecules tend to segregate at interfaces where part of the molecule can contact the water and part does not (in the case of foam it would contact the gas, which is hydrophobic). The hydrophobic parts of the molecules are non-polar groups (have no regions which carry excess partial charges that interact favourably with polar water molecules). These non-polar groups disrupt the hydrogen bonding network in water such that water surrounding these parts of the molecule orders in such a way as to enhance its hydrogen bonding network. This reduces the orientational freedom of the water molecules and therefore decreases their entropy, which is highly unfavourable. This is called the hydrophobic effect. Recall yesterday we discussed another entropically driven intermolecular force between polyelectrolytes. These entropy-driven forces are much less well understood by scientists than enthalpy-driven forces such as electrostatic interactions or van der Waals forces and so are still very active areas of fundamental research.
1st September
Beer Science: why did we use Irish Moss in our brew?
This is to make our final product clearer by removing proteins that create haze in the beer. Large suspended particles in your beer scatter light making it less transluscent. When boiled, the Irish Moss releases negatively charged sugar polymers called carageenans into the beer. The proteins primarily responsible for beer haze are positively charged in the boiling wort (their isoelectric point (where they have no charge) is around pH 6, and the pH of boiling wort is lower than this such that these proteins carry a net positive charge). The carageenans and the haze proteins flocculate together in the wort creating larger particles that sediment to the bottom of the beer and will be removed when the beer is syphoned out of the fermenter at the end of the fermentation process.
A more advanced look at why this happens: So why do the carageenans and the proteins aggregate together? This is not simply a case of positive and negative charges attract – this would primarily be an enthalpically driven process (i.e. a change in internal energy). However the aggregation is primarily an entropically driven process – driven by an increase in the disorder of the system. Both the carageenans and the proteins in solution carry no excess charge due to counter ions in the water which balance the charge carried by the larger molecules, therefore there is no long range attraction between them. However, since the carageenans and proteins are polyelectrolytes (carry multiple charges on the same molecule), if they agglomerate together then they can neutralise multiple charges on the other molecule and release additional counterions into the bulk solution. This release of counterions during the aggregation process increases the number of free species in the solution and hence its disorder, or entropy. It is a law of nature that the entropy of the universe must always increase!

31st August
Firstly we needed to select a yeast that would ferment quickly, is happy at higher fermentation temperatures and has high flocculation so we would get a clear(er) final beer. We got it down to two: a British Whitbread ale yeast (Wyeast 1099) or an American Northwest ale yeast (Wyeast 1332). We decided to go with an English style ale (partly because any fruity flavours from young beer without any rest time on the yeast would be tolerated by this style), so the Whitbread ale yeast it is.
We wanted to stick with traditional English hops but having a strong hop profile that would mask any diacetyl flavours (from the yeast fermentation) in the beer due to the lack of rest time we had available. Our hop additions will give our beer a bitterness of 46 IBU.
Hops for Superposition Pale Ale:
Challenger (U.K.) Mild to moderate, quite spicy. (Bittering, flavouring and aroma)
Target (U.K.) Pleasant English hop aroma, quite intense. (Bittering and aroma)
WGV (Whitbread Golding Variety) Quite pleasant and hoppy, moderately intense. (Flavouring and aroma).
For the choice of fermentables, we wanted a fairly low gravity beer (less than 1.045 OG) so that there wasn’t too much sugar for the yeast to work on in the time available. We used a partial mash with torrified wheat (to give body) and Light Cystal (100) malt for colour. We then used dry malt extract for additional fermentables, such that we’d have an estimated OG of 1.041 and a final beer of 3.8% abv. The colour is expected to be a golden beer (5.9 SRM)

Fingers crossed for a great tasting beer!!
Recipe for Superposition Pale Ale.
30th August
If the beer is going to be ready in time for the final exhibition on the 9th, it’s going to need some speed brewing.
 Dr Johanna Galloway from Leeds University has made some magnetic nanoparticles for us to have a play around with at ASMbly.
Magnetic nanoparticles are very small magnets (50 nm = 0.000005 cm).
When suspended in liquid, they can be moved around and manipulated by externally applied magnetic fields using permanent magnets. This can form dynamic sculptures as the magnetic nanoparticles climb up and down metal objects by moving the magnets towards and away from an object.

Magnetic nanoparticles climbing up a screw.
On Thursday 4th September, any time between 4pm-7pm, you can drop into to ASMbly and have a hands-on play around with magnetic nanoparticles.
If you are interested in collaboration or new materials (or both) this is a good way to get started, and leaves enough time to make something for the final exhibition on September 9th.
In the spirit of ASMbly, we’ll provide as much support as we can muster on the day, and after that you’ll be able to figure it out for yourself. Jo is happy for people to get in touch :-)
Here’s how Jo made the them:


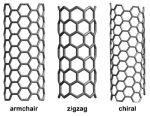
Can we use modelling balloons to make natural structures (DNA, Carbon nanotubes, Buckeyballs, viruses) at ASMbly in the 1st week in September?
 ASMbly 2013 (Artists. Scientists. Makers.) was a week-long popup lab in an empty furniture showroom in Leeds.
The lab was collectively organised by some of the people who take part in the regular Superposition events, as a venue where artists, scientists and makers could work in the same place and have chance to compare and contrast their ways of creating, and sharing, new knowledge.
The first bioLeeds event took place at ASMbly 2013, and bioLeeds participants will be making new things at ASMbly 2014, which starts on Monday 1st September at Live Art Bistro (LAB), 1-2 Regent Street, LS2 7QA, it’s here, opposite Maplins, ending with an exhibition on Tuesday 9th September.
ASMbly is open to anyone who wants to take part, and if you’d like to come along and work on your own idea, collaborate with people with different skills and knowledge, or help with someone else’s idea, get in touch through bioLeeds or Superposition, and we can give you some support and guideance for getting started. You’re not expected to be at the lab full time – come as little or as often as you enjoy and your work needs.


This gallery contains 28 photos
BioLeeds has a stall at Leeds Market on Saturday 2nd August from 12.00pm-3.00 pm, where we are doing some bio-science and art based fun activities to engage with the public of Leeds. Join us to pick up some science with your weekly shop:
1. Test your sense of smell with a few mysterious scents.
2. Take a cell-fie: using your own cells and a home-made microscope we can build your portrait, and give you a copy to take home.
3. Do some fruit and veg chromatography.
We’ll be in the bottom left corner of the market, on the row of butchers stalls.

